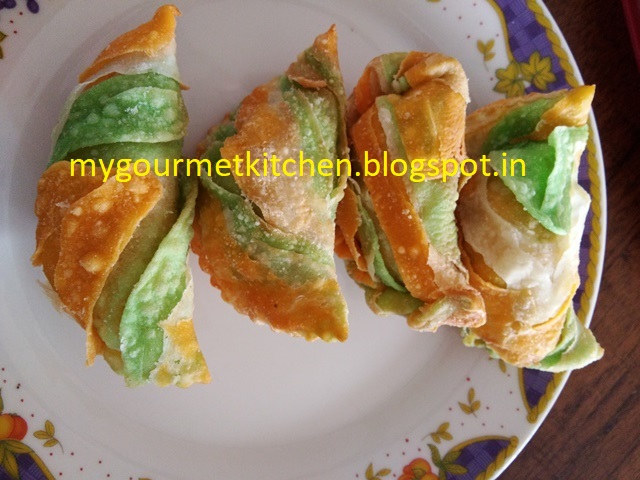
Khajyache kanole is one of the most important CKP delicacy prepared during Diwali. It is in fact considered as an art. Though Maharashtrians have various versions of kanole, which Maharashtrains also refer as karanji; yet CKP version of kanole is different and special. There is lot of labor and skill involved in this preparation as the shells of the CKP Khajyache Kanole are multi-layered and light. It takes around 6 to 8 hours to make kanole as each and every step is pretty tedious and time consuming. Not everyone can actually master this recipe, and very often even after careful preparation the recipe fails to show layers or is too coloured(left in ghee for a minute more). Kanole need to be really light and multi-layered. The layers and lightness of the kanola determines the skills of the maker, I mean that is how it is! People are more interested in checking out the layers and the color of the Kanola other than eating it out. The color of the fried kanola is also important, as it shouldn't be too fried and the white cover of the shell should remain white or little off-white but never brown. The following recipe belongs to my mother-in-law Mrs. Anjali Chaubal.

Ingredients for CKP Kanole Recipe
Ingredients for the dough or shell
Barik Rawa (fine semolina) - 3/4th cup
Milk + water - 1/2 cup,in equal proportion
Ghee - 4 to 6 tsps
Ingredients for Saaran
Ghee(solid cube, preferably refrigerated)
Cornflour
Ingredients for the Filling
Dry coconut powder - 1 cup
Sugar, as required according to your preference
Poppy seeds - 2 tsp
Whole wheat flour - 2 tbsp
Cardomom powder - 1/4th tsp
Nutmeg powder - 1/4th tsp
Ghee
Method for CKP Kanole Recipe
Method for the Filling
To prepare the filling, in a non-stick pan heat ghee on a slow flame. Add the whole wheat flour and saute until the flour turns light brown and releases pleasant aroma. The colour of the flour should be light brown and not dark brown. Remove it from the pan onto a plate and set aside.
In the same pan, dry roast the coconut powder until it is golden brown. Once done, set aside.
Saute the poppy seeds in the same pan until they are slightly coloured. Do not brown them. Set aside.
Once the poppy seeds and coconut have cool down, place them together in a mixer and dry grind them. Remove it in a mixing bowl.
Add to this the wheat flour, sugar, nutmeg powder, cardamom powder and mix well. Check the taste for sugar, it should be added preferably in equal quantity as the wheat flour or according to the preference. Once done store this filing in a air-tight container to use later.
Method for the Dough
In a large bowl, mix barik rawa with the milk and water mixture to make a dough. Moisten a cloth and cover the dough for at least 2 to 3 hours.
Remove the cloth and apply a generous amount of ghee and rub it allover the dough. With the help of a pestle start pounding the dough until the dough gets too soft and flexible. You can add little ghee if the dough starts tearing when you pound it. Just rub the ghee on the dough and roll it into a ball and start pounding again until it is flat, soft and flexible. The process is bit tedious and takes at least half an hour to get the best results.
Once done roll the pounded dough into a ball and cover it with a moist cloth. Set aside until you prepare the saran.
Method for the Saran
Take a large plate and place the solid ghee cube on the center. With the help of your fingers start applying pressure on the ghee and spread or stretch it on the plate from one side to other. Continue doing so until it attains a grainy texture and feels smooth and light. As the ghee incorporates air within, it gets lighter and starts changing it's texture. Once it really softens, start adding little cornflour and continue to mix. Add cornflour with small spoon and keep mixing with finger tips in the ghee. The consistency of this saran mixture should be creamy. Once done set aside and keep it covered with a moist cloth.
Method for Kanole
Remove the moist cloth from the dough and roll it slightly into a medium roll(a hot dog). Divide it into 4 equal parts.
Take one part and and make small parts of it. Put it in a mixture along with 1 tsp ghee and the colour of your choice (edible colours such as green or you could use saffron). Run the mixer until the dough gets the desired colour. Once done, remove the dough and place it under the moist cloth. Repeat the same with the other parts of dough. Keep one part uncolored.
Take one part and roll it into a chapati. Press your finger-tips on the dough and make small and light depressions on the dough. Take care that you do not make holes in the capati. Do it carefully. Spread the saran on the role, taking care to fill all the dents and depressions made on the dough. Place the chapati aside.
Take other part and roll it too into a chapati. Repeat the process of making depressions and applying saran. Place this chapati on the first. Don't press one chapatti on other too hard. Repeat the similar process with the rest of the parts and place each chapati on each other with the saran applied side facing above.
Now start rolling the chapati layer from one side and finish it into a tight roll. Ensure that no bubbles have formed within the roll. Dust your hands with little cornflour or rice flour as this helps efficient maneuvering and the dough doesn't stick on either your hands or the base. Once you have rolled the dough into tight roll, start pulling the roll and lengthen it. The roll should be stretched slowly in one direction only and should form a roll twice the actual size. Cut the long roll vertically into two rolls. Now cut each roll horizontally into small portions. Set them aside and cover them with moist cloth.
Place one portion on a flat surface and start rolling it to form a circle. Make use of little rice flour if the dough is bit sticky. You should roll it only from center to the edges, and not the way you roll chapati(back and forward). Place a little filling on one side of the roll. Place your palm edge to ensure that the filling is placed exactly on one half of the dough. Before closing one edge on the other, moisten the edge with the water-milk mixture. Slightly fold the edge to form a kanole. Press the edges firmly and with the help or a pastry cutter or a shankarpali cutter cut out the extra edges. Place the prepared kanole in a plate and cover with moist cloth. Continue the same with the rest of the dough.
Heat ghee in a deep and heavy bottom pan. Make sure that you heat it on a slow flame. Place the kanole and fry them gently. Do not add many kanole and over-crowd the pan. It is preferable to fry one or two kanole at a time. The flame should be slow and the kanole should not be overturned immediately. The heat temperature of ghee needs to be maintained throughout the frying process. See that you do not change the colour of the kanole. Remove it from the heat and place on absorbent paper.
Tip
1. Whenever you are working with one dough, ensure that all the rest of the dough should be covered with a moist cloth. The dough should be removed from the moist cloth only when it is required to work on and then should be placed back gently inside the moist cloth. Otherwise the dough would dry out and would not provide efficient results.
2. Do not add many kanole and over-crowd the pan
3. While frying the oil temperature needs to be maintained or the kanole would not be cooked properly and also the crust colour would change.
4. The filling required for the kanole preparation can be prepared one or two days in advance and stored in a air-tight container.
5. If you plan to make coloured kanole, use saffron for one dough and green edible colour for the other dough.
6. In the above recipe, we have made four parts of the dough, but you can make as many parts you like and thus increase the layers of chapati to be topped on each other.

recipe dilyabaddal dhanyawad
ReplyDeletesoppi aahe ka
ReplyDelete